In film and television, presentation is part of the pitch. Before anyone reads a single word of your screenplay, its visual format is already making a first impression.
Producers, agents, and readers quickly skim through a script before reading it. If the margins are off, headers are messy, or the dialogue is hard to follow, they may not read past page one. No matter how brilliant your story is, a bad layout screams amateur.
Proper formatting shows you’re serious. It tells the reader, “This writer knows the rules—and respects your time.” Musicians read sheet music. Architects use blueprints. Screenwriters use screenplays to speak the language of film.
That all starts with a solid foundation—from yourscreenplay outline to your final scene. It can be the deciding factor between getting passed over or getting a call.
Before You Start, Know Your Script Type
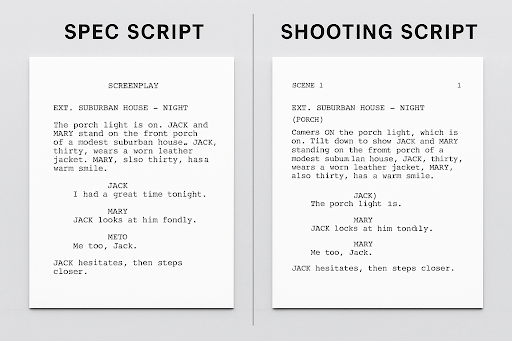
Each type of script has its own formatting rules. That’s why it’s important to know the difference.
Spec Script
Most screenwriters write spec scripts. These are scripts without a guaranteed sale, often for contests, agents, or producers. Writers create a spec script on the speculation that someone will buy or produce it.
Readers engage with it for the story, pacing, and character—not for production cues. This is the industry standard that first-time writers and seasoned pros alike use.
Shooting Script
Filmmakers use the shooting script later on set. It includes technical directions, camera angles, and scene numbers. Unless you’re directing your own film, you won’t need to worry about this format.
Shooting scripts are blueprints for production—not storytelling—so they’re tailored for crews, not readers.
How to Format a Screenplay
You can format it yourself, you’ll learn how to below. Or let screenwriting software like Squibler handle the formatting for you.
The software can save you hours by applying the standard formatting as you start writing. But if you prefer to do it yourself, follow this simple step-by-step guide:
1. Follow the Basic Format Rules
Before you write anything, make sure your screenwriting format is properly set up: adjust your font, margins, spacing, and page layout. Every page should look like a screenplay. Want to see proper formatting in action? You can explore professional examples online or use Squibler’s templates, which apply these standards automatically.
Standard Screenplay Formatting Rules
Font: 12-point Courier (or Courier New). This fixed-width font ensures consistent page timing. Why Courier? Industry-standard formatting uses 12-point Courier because it helps estimate screen time—roughly one page equals one minute. This convention is backed by organizations like the Academy’s Nicholl Fellowships and is widely accepted in screenwriting guides. It makes pacing and timing easier to assess.
Open any pro script—Get Out, The Big Short—and you’ll see the same structure. The thing is, good formatting makes your script easier to read. It’s not meant to restrict you in any way.
Margins:
Left: 1.5 inches (for binding) The left margin is wider (1.5 inches) to allow room for binding.
Right, Top, Bottom: 1 inch.
Page Numbers: Top right corner, starting on page 2 (never number the title page).
Line Spacing: Use single spacing within elements. Add a double space between different elements, like action and dialogue.
Lines Per Page: Keep each page to 55 lines or fewer (minus the page number) to match the one-minute-per-page rule.
Indentation:
Indent character names to 2.2 inches and dialogue to 1.5 inches from the left.
The dialogue itself starts at 1.5 inches from the left margin.
Indent parentheticals (those little notes under the character name) at 1.6 inches.
Tip: Keep it simple. Never bold, underline, or get fancy with fonts. Don’t let formatting draw attention to itself. If your screenplay looks clean and professional, you’re already ahead of the game.
Craig Mazin’s Chernobyl miniseries is a good example of proper formatting.
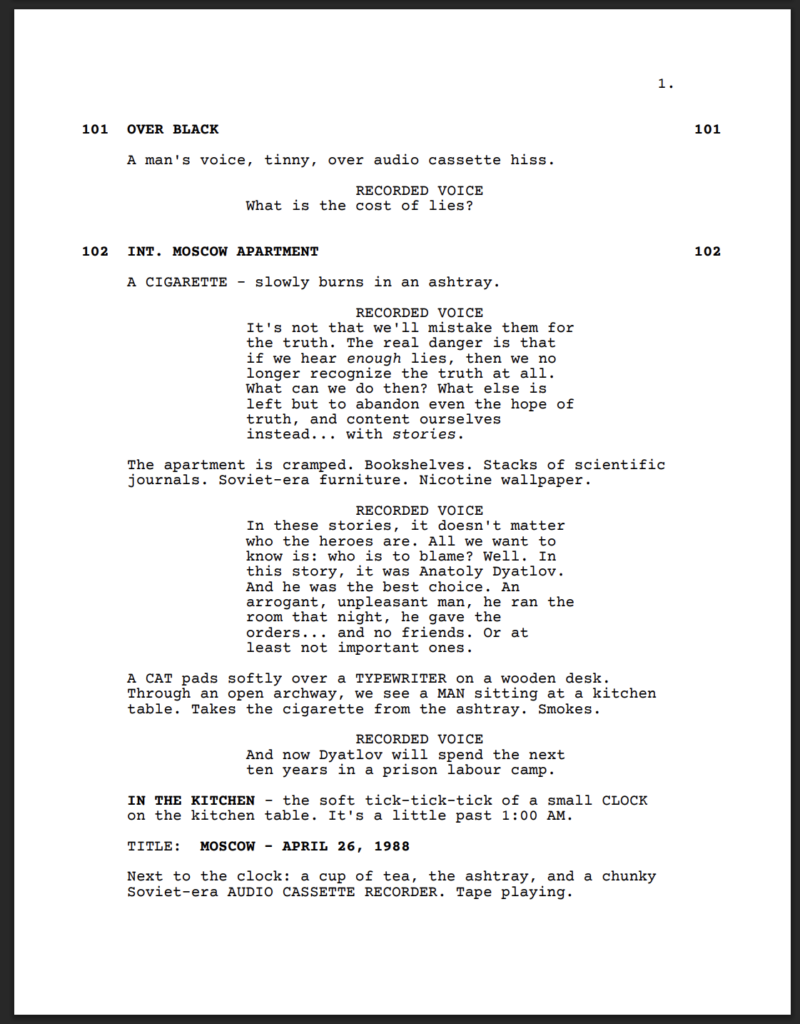
2. Format a Scene Heading (Slug Line)
Every new scene starts with a heading, which is short and appears in all-caps. It tells the reader where and when the scene starts and occurs.
The Three Parts of a Scene Heading
1.INT. or EXT. – Is the scene happening inside (INT.) or outside (EXT.)?
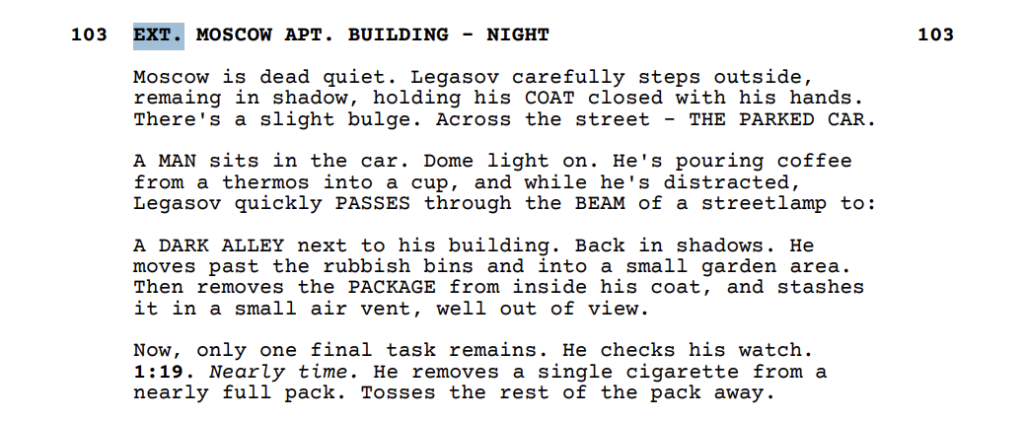
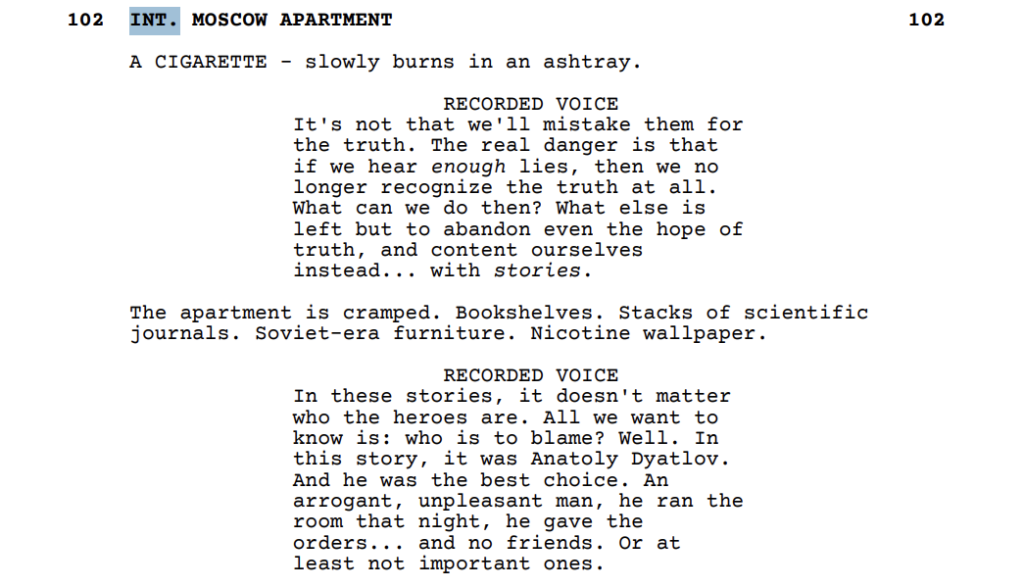
Sometimes, the scene can progress from inside to outside, and vice-versa. In this case, you should use INT./EXT. or EXT./INT.
2. Location – Where is the scene taking place?
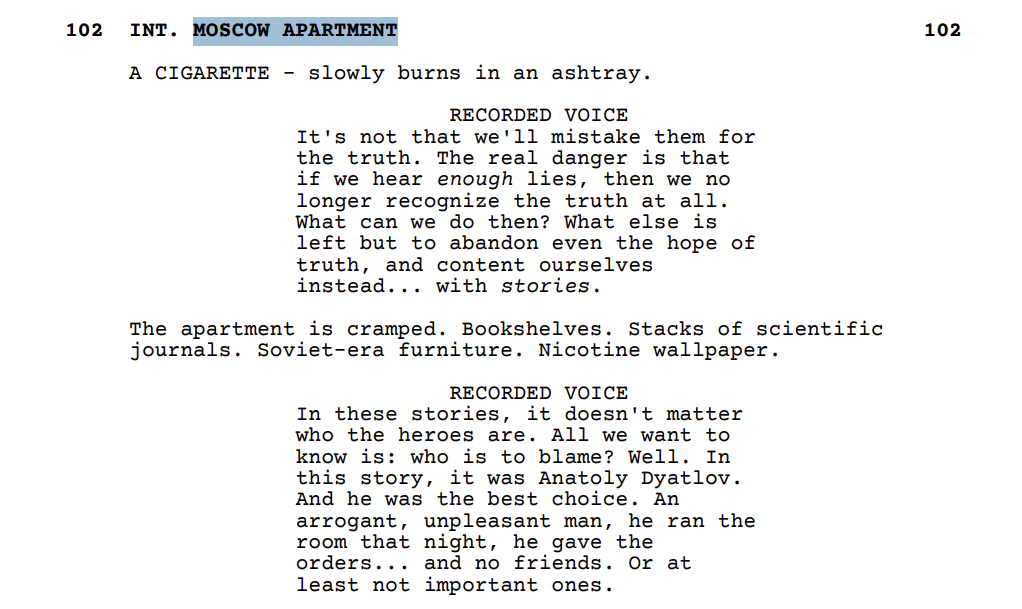
3. Time of Day – Usually DAY or NIGHT (keep it simple). A hyphen separates the location from time of day.
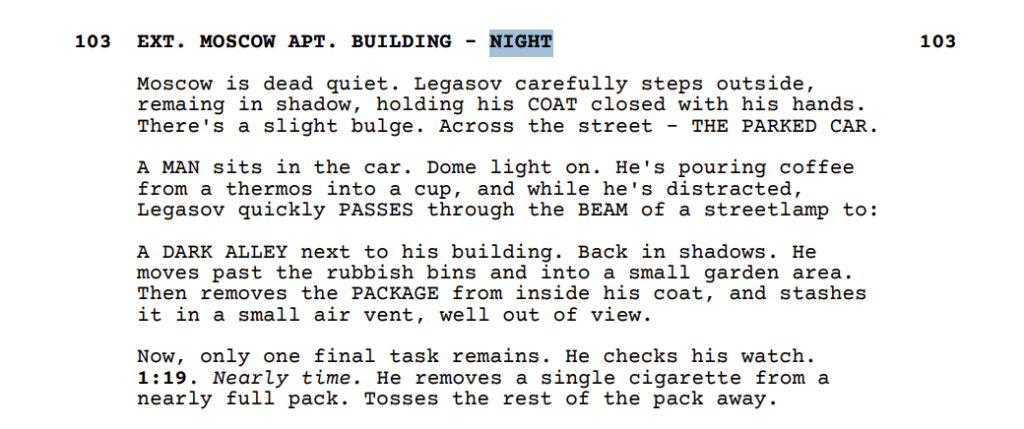
3. Format Action Lines
Action descriptions show what’s happening in the scene—movement, visuals, and mood. It appears under the scene heading and should read like what you’d see on film.
Always write in the present tense. Keep it visual—short sentences that show exactly what’s happening. Each paragraph should land a single visual beat, especially when transitioning from one scene to another.
4. Introduce Characters
Your story revolves around characters; they are the heartbeat of your story. How you introduce them matters.
When a character first shows up, write their full name in all caps. Add a short description—like age, looks, or attitude. A common format is to separate the name, age, and description with commas.
Also, stick to what the audience can see, and not what they are feeling inside. We don’t need his backstory. The example above shows what Alexandr looks like without going into his thoughts.
After you introduce a character, write their name how you like. Some screenwriters continue using ALL CAPS for names throughout the script, not just in the first introduction. Others switch to normal casing after the first mention. Both approaches are acceptable, but just be consistent throughout your script.
But you have to keep their names consistent. For example, the writer introduces ALEXANDR AKIMOV and then uses AKIMOV throughout the script. This keeps the script clear and easy to follow.
5. Format Dialogue
This is where your characters come to life, and how you format it makes a huge difference in how it reads.
When they speak, their name goes centered and in all caps above the dialogue block.

Keep the block narrow—about 2.5 inches wide—centered beneath the character’s name. In a word processor, indent dialogue 1.5 inches from the left and end it about 3 inches before the right edge.
Avoid long speeches. Break them into beats or intercut them with action if needed. If a character gives a monologue, write it like a normal dialogue. But watch the pacing. Break it into short, readable paragraphs and use pauses or visual cues to keep the reader engaged.
In the case of recorded voice, you need to replace the character name with the recorded voice in capitals. For example, when someone is listening to the radio as in the following example:
If a character speaks off-screen, add (O.S.) next to their name. For narration or internal thoughts, use (V.O.), which stands for voice-over.
Write your dialogue as distilled, intentional language that moves the story forward. If it feels stiff, try reading it out loud. You’ll hear what works and what doesn’t.
Use Parentheticals the Right Way
You can also use brief cues in parentheses between the character name and speech—these are called parentheticals. They show how a character speaks or what they’re doing—only if it’s not already clear.
Use parentheticals to show tone, a quick action, or to make it easier to understand. It also helps you add small actions inside the dialogue without moving to the action line and breaking it.
Not all actors and producers appreciate parentheticals, however, as many prefer to interpret the tone or action themselves based on context. In case you have to add parentheticals, make sure you are using the right format.
6. Format Transitions and Camera Directions
Transitions and camera shots were once heavily used in feature films, but they’re not as common today. Still, professional screenwriters use them, and if you choose to include cuts or camera shots in your script, format them correctly.
Place common scene changes like CUT TO:, CUT TO BLACK., FADE IN:, and FADE OUT. on a separate line in all caps. Align CUT TO:, CUT TO BLACK., and FADE OUT. to the right, and align FADE IN: to the left.
The reason for this is that FADE IN: signals the start of a scene, so it is placed to the left to stand out as a distinct transition. On the other hand, CUT TO., CUT TO BLACK., and FADE OUT. are aligned to the right, signaling the end of a scene or transition, which is why they appear on the right side of the page.
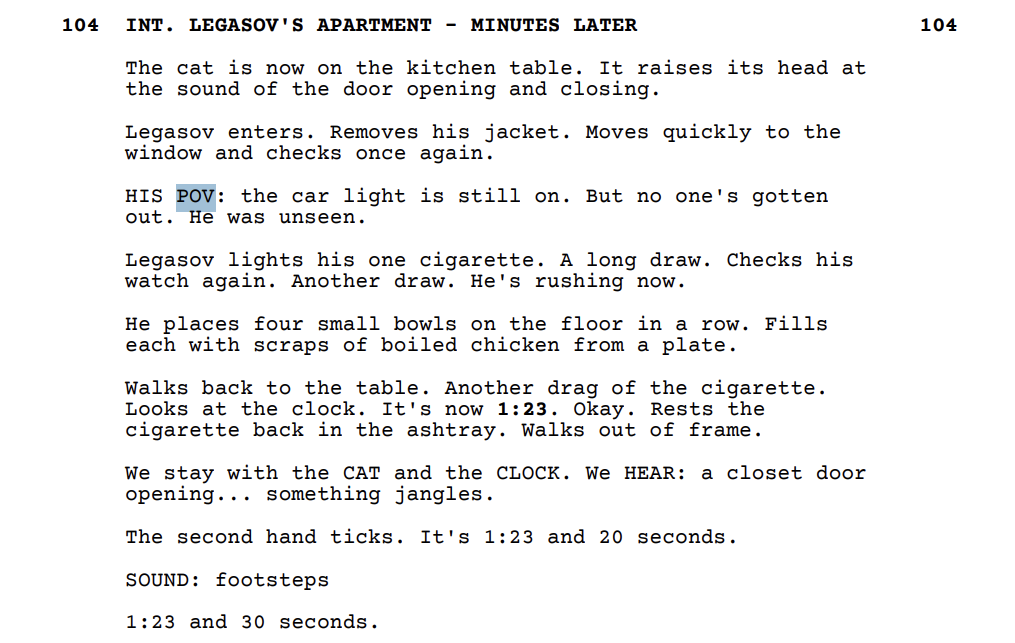
If you want to suggest a camera shot, use capital letters and mention it directly in the script. POV is one of the few camera directions sometimes used in spec scripts, especially when it adds clarity or emphasizes a character’s perspective.
Include it as a subheading or integrate it into the action, like this:
While transitions and camera shots can contribute to visual clarity, use them sparingly to keep the focus on the story. Spec screenplays avoid camera directions like “PAN TO” or “CLOSE ON”, as these are decisions left to the director and DP (director of photography). For example:
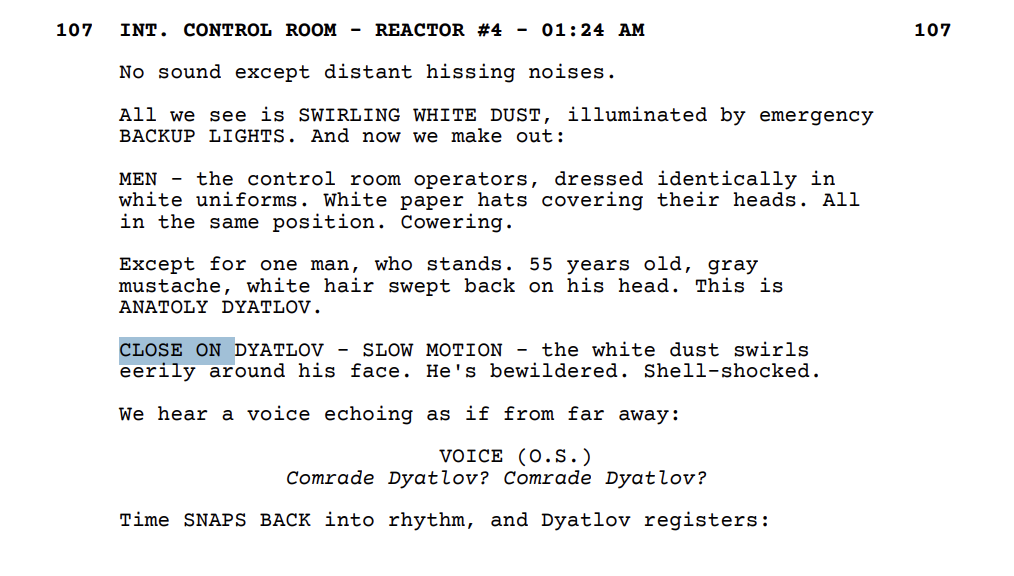
Used like this, it creates a moment of emphasis the reader might miss otherwise.
If these steps feel overwhelming, try using software to write screenplays.
When and Why to Use Screenwriting Software
Sure, you can format a screenplay manually using Word or Google Docs, but it’s like building a house with your hands—it’s possible, but inefficient. You’ll spend more time adjusting margins and fixing indentations than actually writing.
Screenwriting software removes those headaches, letting you focus on what matters. It automatically handles the formatting for you, placing headings, names, dialogue, and camera changes in the right spots.
Most screenwriting apps also offer templates that follow industry standards, ensuring your script is correctly formatted from the start. Plus, the software checks your formatting in real-time, so you don’t have to worry about things like INT./EXT. or dialogue indentations. This means cleaner drafts, faster revisions, and more time spent writing.
Why Squibler Works for Screenwriters
Squibler helps you focus on what matters: writing a strong story without fighting with margins and tabs. The screenplay generator can either help you outline from scratch or import a rough draft.
Main features that screenwriters love:
Automatic screenplay formatting that adheres to industry standards.
Drag-and-drop scene organizer lets writers rearrange story beats quickly without losing formatting.
Storyboarding tools that let you see your screenplay’s rhythm at a glance.
An AI co-writer to help brainstorm dialogue, fix clunky sentences, or flesh out scene descriptions.
Distraction-free mode so you can zero in when it’s time to write.
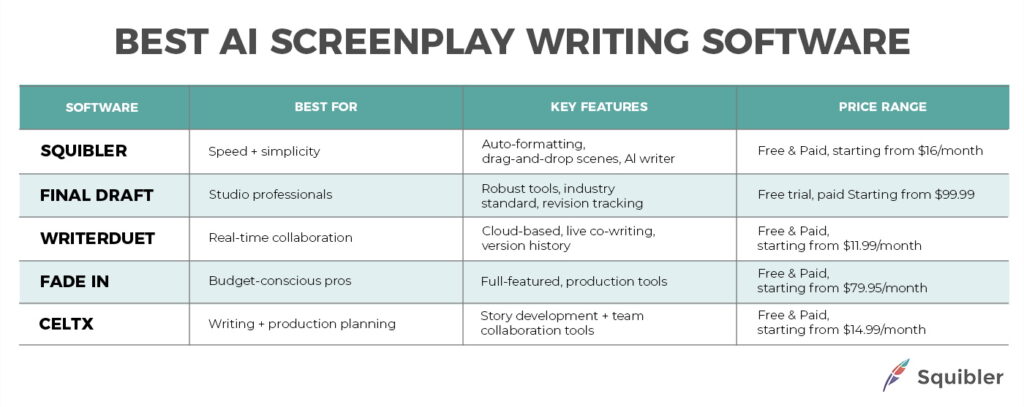
Squibler and other screenwriting tools compared:
Common Screenwriting Mistakes (and How to Avoid Them)
Here are five common pitfalls that can make even a great story look unpolished, and how to steer clear of them:
Inconsistent formatting:
Don’t bold, underline, or tweak slugs at random. Stick to the standard format and keep it uniform throughout.
Redundant scene descriptions:
If your slug says “INT. KITCHEN – DAY,” don’t follow it with “It’s daytime in the kitchen.”
Careless typos:
Simple errors (like
breaks
vs.
brakes
) break the reading flow and make your work feel rushed.
Overusing all caps:
Shouting every sound effect, prop, or action in all caps overwhelms the page. Use sparingly—for names, key sounds, or emphasis.
Worrying more about tools than writing:
The software you use doesn’t matter if your screenplay lacks structure or heart. Prioritize the writing.

Final Thoughts on How to Format a Screenplay
Although screenplay formatting matters, don’t let it paralyze you. The rules are here to help your script land with clarity and confidence, not to box you in. So keep your pages clean. Use the tools that work for you and focus on what gets your screenplay noticed.
FAQs
Here are the most common questions that authors ask regarding the formatting of a screenplay:
What is the proper format for a screenplay?
Write your screenplay in 12-point Courier font with 1-inch margins (1.5 inches on the left), and apply specific formatting to headings, action, dialogue, and character names. Industry-standard formatting makes it easy to read and time.
How do you structure a screenplay?
Most screenplays follow a three-act structure: Setup (Act 1), Confrontation (Act 2), and Resolution (Act 3). Within that, beats like the inciting incident, midpoint, and climax guide the flow of the plot.
What are the 5 parts of a screenplay?
While not official, some writers break arcs into five basic phases: Opening, Inciting Incident, Rising Action, Climax, and Resolution. This mirrors the flow of a three-act structure.
How to write a screenplay for beginners?
Start with an idea, outline your story beats, and then follow screenwriting format rules as you write. Focus on visuals, keep your speeches tight, and write in the present tense. Using software can make the process easier from the start.
What software should I use to write a screenplay?
Squibler is a great option for beginners and pros alike—it handles formatting automatically and includes outlining tools. Other good choices include Final Draft, Fade In, WriterDuet, and Celtx.
